Server Provisioning CentOS with Ansible
Robots Building Robots
Introduction
Ansible is a powerful tool for provisioning CentOS on commercial grade linux webservers. In my last article, Webmin Configuration on CentOS, I discussed the steps to setup a new server complete with Webmin and Percona. This is our preferred setup for reliable webservers, but one glance at the article will make it obvious that there are quite a few steps. Like any good programmer, I can’t stand repetition, hence seek to automate.
“Most of you are familiar with the virtues of a programmer. There are three, of course: laziness, impatience, and hubris.”
– Larry Wall
A process known as server provisioning will help us outfit a new machine with all the tools we want, automatically. There are many different tools that can be employed for doing this, and we have tried several. I’d like to write about the approach that we have converged on.
We find Ansible to be the simplest and therefore, most appealing for our purposes. Other approaches that we have used, like Chef, are very powerful, but equally configuration heavy – and more complex than we typically need for webservers.
Since my last article there is a new minor-version of CentOS available – CentOS 6.5. This new version alleviates the need for some of the caveats in my last article, but creates some new gotcha’s along the way.
Here I will provide a working Ansible playbook for provisioning a new:
- CentOS 6.5 server
- complete with server management software Webmin/Virtualmin
- using a high performance database Percona/MySQL.
I will also show you how I tested this on real hardware using DigitalOcean hardware – for pennies-on-the-droplet.
What’s the Point?
Before we get too mired in the technical details of automated server provisioning, why are we talking about this?
Previously we discussed the details involved with setting up a single server, this is useful, but of course, tedious. Automating this procedure means server deployment is:
- less expensive – speeding up the process means less time and less cost to produce our level of excellence
- more reliable – automatic setup helps remove the possibility of human error, and means we remember all the details
- more familiar – a predictable environment to run on means we can tune our development processes
So this is the point – improved Quality Assurance for both our clients and for us as developers. Additionally, we can use virtual servers to precisely mimic the production environments that our software will run on later, in real life. There are several advantages to this, but the main goal is to save time and money, while increasing site reliability.
So this allows us to create predictable environments in which to develop. Whether we’re building a simple WordPress website, or a beastly complicated Java Web Application like 76insights, we can mock the machine it will run on. This is great for development, given that our team members each develop on different operating systems. Also, and more critically, this reduces the number of variables between development and production environments.
Ansible
The idea from the last article was basically writing down some of the modifications that we usually make when building a new server. Roughly speaking, the overview of what we did from a new OS install can be listed:
- install Webmin
- make sure Apache is installed
- install Persona (replacing MySQL)
- ensure PHP is up-to-date
- tweak the FastCGI configuration
Simple. But the article was much longer than that! Wouldn’t it be nice if we could just script the steps above and save that script so we could repeat, as needed?
That is precisely what Ansible does for us.
Some of the primary features of Ansible (and the ones that are important for us), are that it’s:
- streamlined and fast
- requires no node agent installation
- functions over SSH
- built on Python
The basic idea with the Ansible approach is to build playbooks. Simply enough, these playbooks contain plays, which are simply snippets that allow us to script the steps of the deployment tasks. These tasks are then ‘pushed’ onto the target machine(s) et voila, we produce exactly the results we want with a single command.
pro-tip:we present the Ansible scripts first, you can follow along on your own DigitalOcean droplet
Our First Playbook
In order to create our first playbook [the naïve but] quickest way is to literally just start scripting. The following snippet will actually perform all the steps we need to do to install Webmin on a fresh machine:
vim webmin.yml
---
- hosts: all
  user: root
  tasks:
  - name: ensure wget present
    yum: name=wget state=present
  - name: download virtualmin install script
    shell: wget http://software.virtualmin.com/gpl/scripts/install.sh creates=/root/install.sh
  - name: virtualmin install executable
    file: path=/root/install.sh mode=0755
  - name: virtualmin install (possibly ~15 mins)
    shell: ~/install.sh --yes chdir=/root
  - name: Virtualmin Post-Installation Wizard
    pause: prompt="virtualmin post-installation, https://{{inventory_hostname}}:10000"
vim hosts
[all]
ocean.76labs.com
Then we can easily run the playbook, and install webmin:
pro-tip:see how to setup ansible on a workstationansible-playbook -i hosts webmin.yml
Another of the attractive features of Ansible is the declarative syntax it uses. I find the script above very readable and easy to follow.
This is a great way to get started, but as you can imagine, this flat structure will quickly get out-of-hand as the ruleset starts to grow. To avoid this pitfall and indeed to follow Ansible Best Practices, next we will consider how to better structure our playbook for more complex tasks.
A More Advanced Layout
As our playbooks start to grow in complexity, we quickly want to start fractioning out the tasks in more digestible bits. This is where roles come in and we can start to layout our playbook according to best practices. We have built a playbook that will provision our server, by:
- install Webmin and Virtualmin
- install required
yum-repositories - replace MySQL with Percona
- upgrade to PHP 5.5
Here is the file-structure for the playbook:
.
├── site.yml
├── hosts
├── LICENSE
├── README.md
└── roles
    ├── percona
    │   ├── files
    │   │   └── my.cnf
    │   ├── handlers
    │   │   └── main.yml
    │   ├── meta
    │   │   └── main.yml
    │   └── tasks
    │       └── main.yml
    ├── php
    │   ├── meta
    │   │   └── main.yml
    │   └── tasks
    │       └── main.yml
    ├── webmin
    │   └── tasks
    │       └── main.yml
    └── yum-repos
        └── tasks
            └── main.yml
You will have to clone the github repo to see the playbook code. In the interest of pace, we have decided not to dissect the code here, hopefully you will find Ansible readable enough to self-document. As we explain below, it is simply a matter of checking out the above playbook and running it:
git clone https://github.com/burlresearch/ansible-webmin.git
cd ansible-webmin
ansible-playbook -i hosts site.yml
Assuming everything goes smoothly, you should have your server fully provisioned in a matter of minutes. This is the power of Ansible. By putting a bit of work into planning for the system we know we need, we can achieve all our goals, with ease:
- less expensive
- more reliable
- more predictable
Provisioning Cloud Servers
iWeb Cloud – Motivation
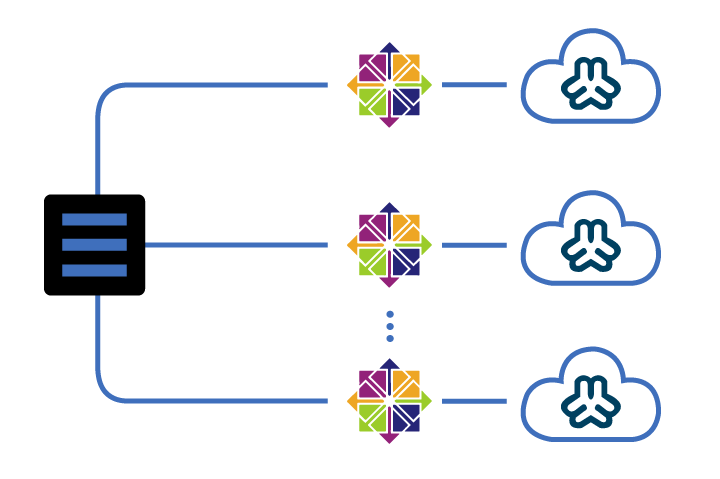
Recently we took part in the iWeb Cloud Βeta program in order to help evaluate their new cloud server offering. Became apparent that we needed a mechanism to quickly and easily generate servers with the software of our choice. Using Ansible gave us the opportunity to quickly generate and regenerate server nodes. Servers are no longer monolithic entities, but rather dispensable processing agents that simply run an operating system.
DigitalOcean – Live Testing the Scripts
No matter which choice you make for our cloud server provider, Ansible will work since it only requires an SSH connection. We chose DigitalOcean for testing the scripts on this article. Though iWeb would have been just as simple, it was more convenient for us to not to charge the corporate account in this instance. So here are the steps to get a DigialOcean Cloud Service running:
- Sign Up or Log In: to your DigitalOcean account:
https://cloud.digitalocean.com/registrations/new - Enter a Hostname: we use a subdomain we control,
ocean.76labs.com, but you may simply use a hosts definition - Select Size: Choosing at least
1GB/1CPU 30GB SSD DISKis recommended for MySQL with Apache - Select Image:
CentOS 6.5 x64 optionalAdd SSH keys: if you have a key, else wait for the email to setup yourroot passwordon the new dropletCreate Droplet
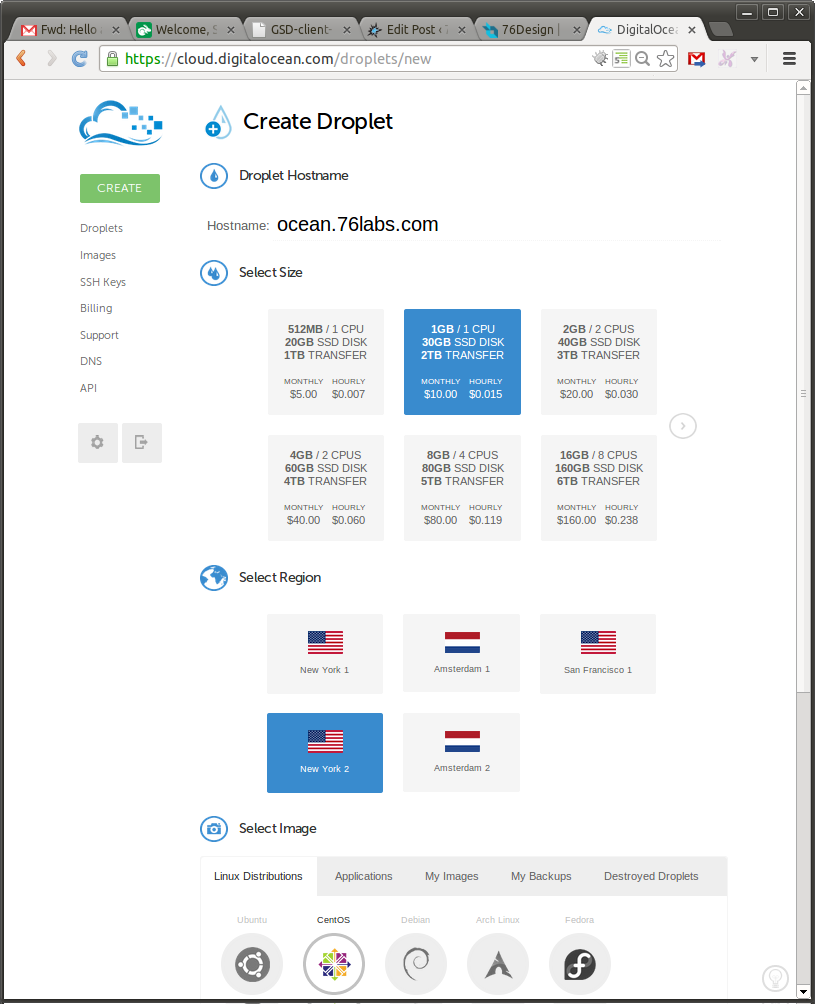
DigitalOcean interface for creating a new Droplet.
Congratulations, you have a new, LIVE server, for testing and deployment! If you’re concerned about the price, all the testing we did for this article ended up costing US $0.14 – money well spent :)
Ansible – Setup
I use a Ubuntu Linux workstation – so your mileage may vary depending on your operating system. For me, setting up Ansible was a matter of:
sudo add-apt-repository ppa:rquillo/ansible
sudo apt-get update
sudo apt-get install ansible
Then, it is simply a matter of checking out the Ansible scripts I have prepared on github and running the playbook (ensure the edit the hosts file specific to your server):
git clone https://github.com/burlresearch/ansible-webmin.git
vim hosts   # set your server IP
cd ansible-webmin
ansible-playbook -i hosts site.yml
Hopefully you can follow along with the on-screen instructions and in a few minutes, your new server should be completely configured!
TL;DR
In conclusion, we have outlined how to completely provision a new server with all the tools we require. We have done this using an Ansible playbook, with a little preparation, having minimized time and maximized reliability.
Previously we discussed the details involved with setting up a single server, manually. Here we introduced Ansible to automate that provisioning procedure.
In our next article we will discuss how to put all our developers on equal footing. We will discuss virtualization with Vagrant – how to precisely mimic a production environment, without any hardware…